Version: 9.4.5.v20170502
Version: 9.4.5.v20170502 |
private support for your internal/customer projects ... custom extensions and distributions ... versioned snapshots for indefinite support ... scalability guidance for your apps and Ajax/Comet projects ... development services for sponsored feature development
There are no components that ship with the Jetty Distribution to make it a formal Windows Service.
However, we recommend the use of Apache ProcRun’s Daemon.
The techniques outlined here are based on Windows 7 (64-bit), using JDK 8 (64-bit), running on an Intel i7 architecture machine.
Prepare some empty directories to work with.
C:\> mkdir opt
C:\> cd opt
C:\opt> mkdir jetty
C:\opt> mkdir logs
C:\opt> mkdir myappbase
C:\opt> mkdir temp
C:\opt> dir
 Volume in drive C has no label.
 Volume Serial Number is DEAD-BEEF

 Directory of C:\opt

11/21/2013  04:06 PM    <DIR>          .
11/21/2013  04:06 PM    <DIR>          ..
11/21/2013  04:06 PM    <DIR>          jetty
11/21/2013  04:06 PM    <DIR>          logs
11/21/2013  04:06 PM    <DIR>          myappbase
11/21/2013  04:06 PM    <DIR>          temp
               0 File(s)              0 bytes
The directory purposes are as follows:
Where the logs for the service layer will put its own logs.
Typically you will see the audit logs (install/update/delete), StdOutput, and StdError logs here.
This is the temporary directory assigned to Java by the Service Layer (this is what Java sees as the java.io.tmpdir System Property).
This is intentionally kept separate from the standard temp directories of Windows, as this location doubles as the Servlet Spec work directory.
Or download Java 8 from: http://www.oracle.com/technetwork/java/javase/downloads/index.html
C:\opt>java -version
java version "1.7.0_45"
Java(TM) SE Runtime Environment (build 1.7.0_45-b18)
Java HotSpot(TM) 64-Bit Server VM (build 24.45-b08, mixed mode)
Download a copy of the ZIP distribution from the Official Eclipse Download Site
Extract the contents of the jetty-distribution-{VERSION} directory to C:\opt\jetty
Once complete, the contents of the C:\opt\jetty directory should look like this:
C:\opt\jetty>dir
 Volume in drive C has no label.
 Volume Serial Number is C8CF-820B

 Directory of C:\opt\jetty

11/21/2013  12:13 PM    <DIR>          .
11/21/2013  12:13 PM    <DIR>          ..
11/21/2013  12:13 PM    <DIR>          bin
11/21/2013  12:13 PM    <DIR>          demo-base
11/21/2013  12:13 PM    <DIR>          etc
11/21/2013  12:13 PM    <DIR>          lib
11/21/2013  12:13 PM            30,012 license-eplv10-aslv20.html
11/21/2013  12:13 PM    <DIR>          logs
11/21/2013  12:13 PM    <DIR>          modules
11/21/2013  12:13 PM             6,262 notice.html
11/21/2013  12:13 PM             1,249 README.TXT
11/21/2013  12:13 PM    <DIR>          resources
11/21/2013  12:13 PM    <DIR>          start.d
11/21/2013  12:13 PM             2,126 start.ini
11/21/2013  12:13 PM            72,226 start.jar
11/21/2013  12:13 PM           341,784 VERSION.txt
11/21/2013  12:13 PM    <DIR>          webapps
               6 File(s)        453,659 bytes
              11 Dir(s)  306,711,420,928 bytes free
Download a copy of the Apache ProcRun native binaries.
You should have downloaded a file named commons-daemon-1.0.15-bin-windows.zip (the version might be different).
Open the ZIP file and extract the prunmgr.exe and prunsrv.exe files into the C:\opt directory.
Make sure to get the right version of prunsrv.exe for your environment.
The ZIP file has both 32 bit and 64 bit versions of this file.
Once you are complete, the contents of C:\opt directory should look like this:
C:\opt> dir
 Volume in drive C has no label.
 Volume Serial Number is DEAD-BEEF

 Directory of C:\opt

11/21/2013  04:06 PM    <DIR>          .
11/21/2013  04:06 PM    <DIR>          ..
11/21/2013  04:06 PM    <DIR>          jetty
11/21/2013  04:06 PM    <DIR>          logs
11/21/2013  04:06 PM    <DIR>          myappbase
11/21/2013  04:06 PM    <DIR>          temp
11/21/2013  04:11 PM           104,448 prunmgr.exe
11/21/2013  04:11 PM            80,896 prunsrv.exe
               2 File(s)        185,344 bytes
Now it’s time to setup your new ${jetty.base} directory to have all of your WebApps and the configurations that they need.
We’ll start by specifying which modules we want to use (this will create a start.ini file and also create a few empty directories for you)
C:\opt\myappbase>java -jar ..\jetty\start.jar --add-to-start=deploy,http,logging

WARNING: deploy          initialised in ${jetty.base}\start.ini (appended)
WARNING: deploy          enabled in     ${jetty.base}\start.ini
MKDIR: ${jetty.base}\webapps
WARNING: server          initialised in ${jetty.base}\start.ini (appended)
WARNING: server          enabled in     ${jetty.base}\start.ini
WARNING: http            initialised in ${jetty.base}\start.ini (appended)
WARNING: http            enabled in     ${jetty.base}\start.ini
WARNING: server          enabled in     ${jetty.base}\start.ini
WARNING: logging         initialised in ${jetty.base}\start.ini (appended)
WARNING: logging         enabled in     ${jetty.base}\start.ini
MKDIR: ${jetty.base}\logs

C:\opt\myappbase>dir
 Volume in drive C has no label.
 Volume Serial Number is C8CF-820B

 Directory of C:\opt\myappbase

11/21/2013  12:49 PM    <DIR>          .
11/21/2013  12:49 PM    <DIR>          ..
11/21/2013  12:49 PM    <DIR>          logs
11/21/2013  12:49 PM             1,355 start.ini
11/21/2013  12:49 PM    <DIR>          webapps
               1 File(s)          1,355 bytes
               4 Dir(s)  306,711,064,576 bytes free
At this point you have configured your C:\opt\myappbase to enable the following modules:
C:\opt\myappbase\webapps directory.This sets up a single Connector that listens for basic HTTP requests.
See the created start.ini for configuring this connector.
C:\opt\myappbase\logs directory.See the section on Using start.jar for more details and options on setting up and configuring a ${jetty.base} directory.
At this point you merely have to copy your WAR files into the {$jetty.base}/webapps directory.
C:\opt\myappbase> copy C:\projects\mywebsite.war webapps\
At this point you should have your directories, Java, the Jetty distribution, and your webapp specifics setup and ready for operation.
We will use the Apache ProcRun’s prunsrv.exe to install a Jetty Service.
The basic command line syntax is outlined in the link above.
A example install-jetty-service.bat is provided here as an example, based on the above directories.
@echo off
set SERVICE_NAME=JettyService
set JETTY_HOME=C:\opt\jetty
set JETTY_BASE=C:\opt\myappbase
set STOPKEY=secret
set STOPPORT=50001

set PR_INSTALL=C:\opt\prunsrv.exe

@REM Service Log Configuration
set PR_LOGPREFIX=%SERVICE_NAME%
set PR_LOGPATH=C:\opt\logs
set PR_STDOUTPUT=auto
set PR_STDERROR=auto
set PR_LOGLEVEL=Debug

@REM Path to Java Installation
set JAVA_HOME=C:\Program Files\Java\jdk1.7.0_45
set PR_JVM=%JAVA_HOME%\jre\bin\server\jvm.dll
set PR_CLASSPATH=%JETTY_HOME%\start.jar;%JAVA_HOME%\lib\tools.jar

@REM JVM Configuration
set PR_JVMMS=128
set PR_JVMMX=512
set PR_JVMSS=4000
set PR_JVMOPTIONS=-Duser.dir="%JETTY_BASE%";-Djava.io.tmpdir="C:\opt\temp";-Djetty.home="%JETTY_HOME%";-Djetty.base="%JETTY_BASE%"
@REM Startup Configuration
set JETTY_START_CLASS=org.eclipse.jetty.start.Main

set PR_STARTUP=auto
set PR_STARTMODE=java
set PR_STARTCLASS=%JETTY_START_CLASS%
set PR_STARTPARAMS=STOP.KEY="%STOPKEY%";STOP.PORT=%STOPPORT%

@REM Shutdown Configuration
set PR_STOPMODE=java
set PR_STOPCLASS=%JETTY_START_CLASS%
set PR_STOPPARAMS=--stop;STOP.KEY="%STOPKEY%";STOP.PORT=%STOPPORT%;STOP.WAIT=10

"%PR_INSTALL%" //IS/%SERVICE_NAME% ^
  --DisplayName="%SERVICE_NAME%" ^
  --Install="%PR_INSTALL%" ^
  --Startup="%PR_STARTUP%" ^
  --LogPath="%PR_LOGPATH%" ^
  --LogPrefix="%PR_LOGPREFIX%" ^
  --LogLevel="%PR_LOGLEVEL%" ^
  --StdOutput="%PR_STDOUTPUT%" ^
  --StdError="%PR_STDERROR%" ^
  --JavaHome="%JAVA_HOME%" ^
  --Jvm="%PR_JVM%" ^
  --JvmMs="%PR_JVMMS%" ^
  --JvmMx="%PR_JVMMX%" ^
  --JvmSs="%PR_JVMSS%" ^
  --JvmOptions="%PR_JVMOPTIONS%" ^
  --Classpath="%PR_CLASSPATH%" ^
  --StartMode="%PR_STARTMODE%" ^
  --StartClass="%JETTY_START_CLASS%" ^
  --StartParams="%PR_STARTPARAMS%" ^
  --StopMode="%PR_STOPMODE%" ^
  --StopClass="%PR_STOPCLASS%" ^
  --StopParams="%PR_STOPPARAMS%"

if not errorlevel 1 goto installed
echo Failed to install "%SERVICE_NAME%" service.  Refer to log in %PR_LOGPATH%
goto end

:installed
echo The Service "%SERVICE_NAME%" has been installed

:end
Configuration’s of note in this batch file:
The port that the Shutdown Monitor listens on for the stop command.
If you have multiple Jetty servers on the same machine, this port will need to be different for each Service.
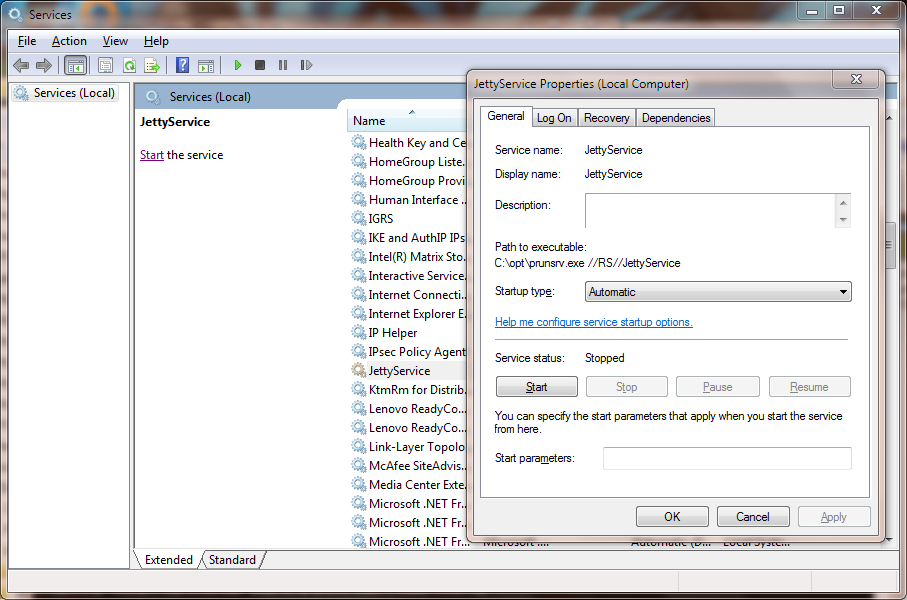
Once you have run prunsrv.exe //IS/<service-name> (done for you in the above batch file) to install the service, you can use the standard Windows utilities to manage (start/stop/restart) the Jetty service.
Open the Service View and start your service.